All I want for Christmas is…

COELIAC FRIENDLY FOOD!

Another year has come and gone so quickly, I cannot believe i’m saying it but it’s Christmas season! And what better way to get into spirit then thinking of all the food you can buy for the holiday period (being mindful of waste of course)!

3 years ago I was getting ready for my first Christmas as a newly diagnosed coeliac and my god was I worried. “What will I be able to eat”, “can I still have cheese and crackers”, what do I do about going my Nan’s?” All these questions, plus more, spun round my head!

Then I headed to Instagram and saw people like GlutenFreeAlice, GFBlogger and MyGlutenFreeGuide. What a relief!! So here I am repaying to the community what was so incredibly helpful for me…

Welcome to my Christmas 2021 Gluten Free Food Guide 🎄🤍

This guide is simply pictures and the supermarket location that I’ve spotted in the UK. Some items are Holiday Season specific and others are everyday items that maybe you’ve not tried yet or didn’t know where to buy them, or they’re just gonna be extra tasty this Christmas!!

Please note I will continue to add to this the more I find things throughout December! I also haven’t included ingredients or prices (for all supermarkets) of items, but have included a weblink for each store where you will be able to find this information out.

Asda

Tesco

Morrisons

Sainsburys

Marks & Spencers

I definitely cannot wait to get my Christmas shop this year! Keep an eye out on Instagram to see what I end up getting!! Let me know what treats you buy in the comments or using the hashtag #TheUnluckyCoeliac 🤍

With love

The Unlucky Coeliac xo

Quick, Easy Meals for the Working Parent

It’s no secret that I am a parent, or that alongside blogging and creating content I am in full time employment. Therefore when it comes to feeding myself or my family a lot of the time it needs to be quick, easy and well still packed full of nutrition! I wont lie, it doesn’t always happen that way and well thats okay! A fed happy family is the best I can ask for.

Here you’ll find a collection of meals for breakfast, lunch, dinner and those in between times when you realise you haven’t eaten but your child has! This is something i’ve been working on over the last few months that i’ve tried in real time and during real life! They work, they’re tasty and the fill your tummy…

Moving from left to right, row by row we have;

Gluten and dairy free pancakes

Ingredients; 1 cup gluten free flour, 1.5 cups of milk alternative I use soya, vanilla extract, salt and baking powder. Method; add to a mixing bowl the flour, pinch of salt and a flat teaspoon of baking powder. Heat your milk in the microwave/stove (however you like, I actually use my swan milk frother. The add the milk and two drops of vanilla extract to the dry ingredients and mix. In a pan put a teaspoon of coconut oil 9or oil of choice), heat until melted and lower the heat to low-mid. Spoon amounts into your pan to your desired size of pancake you’d like and allow to cook. Once the pancakes are showing lots of bubbles then flip them. I find that gluten free pancakes can look a little pale, so don’t let this dishearten you! Top with your choice of toppings, in the image I’ve gone with peach yoghurt (no dairy free) for Lewis and crunchy almond butter and syrup for myself!

Gluten free porridge

This one isn’t dairy free as we were trying to encourage lewis to try milk, he isn’t off formula yet and that’s fine with us/him and his health visitors. You could easily swap the milk for a milk alternative at a 1:1 ratio as that is what I usually do for myself.

Ingredients; 3/4 cup gluten free oats, 1 cup milk, 1 tablespoon honey & fruit to top (optional). Method; add the oats and milk to a pan and heat on a medium heat until it starts to thicken, then add the honey and lower the heat. Depending on the consistency you would like it does vary on timings. I find for a thick yet still smoothly falls off the spoon texture it cooks for between 8-10 minutes in total. For a thick doesn’t move kind of porridge you wanna keep it cooking for around 15 minutes. Remember to keep stirring when cooking porridge otherwise it will stick!!

Soft cheese and avocado toast

I know it’s not dairy free but so can easily be! Cheese is my downfall and as this isn’t an allergy/intolerance but an upset upon large consumption I can play with diary a little more than others. But there are loads of great soft cheeses out there if you are lactose free, vegan or dairy free! So I would recommend going with one you know you like as it will make this brunch classic so much nice and enjoyable for you!

Ingredients; 2x bread, 1 avocado, soft cheese of choice (I used Philadelphia), black pepper (optional) and lemon or lime juice. Method; toast your bread to your liking, whilst it’s toasting slide the knife around the avocado to cut it in half and the twist and pull the two halves away from each other. Remove the seed and peel your avocado. Slice into small strips, as thin or chunky as you like. Once your toast is done, add about 1.5 tablespoons of soft cheese to each slice and spread evenly. Top with half an avocado on each slice, sprinkle of lemon/lime juice and as much black pepper as you’d like! Then tuck in and enjoy!!

Chicken curry

Ready for the controversial comment… This is made using a jar of pre-made sauce! I know… (* the curry sauce I used and am referring to is the Aldi own jalfrezi jar that comes with spices to use. If you are using other brands/styles you may not have spices to use and just the sauce. Therefore you can disregard the adding the spices section of the method).

Ingredients; chicken thighs (1 per person), 1 x peppers (Add more if there aren’t already peppers in your curry sauce), 1 jar of curry sauce*, 400g tin of chopped tomatoes. Method; chop the pepper into small chunks, heat a frying pan with a bit of oil; I used rapeseed here. Brown off each side of the chicken thighs, then add the peppers and the spices from the curry sauce. Once fried off, turn of the heat and add to your ingredients to the slow cooker. Top the chicken, peppers and spices off with the tinned tomatoes and curry sauce, season with salt and pepper, then cook on low for a few hours. About 2 hours in I remove the chicken thighs and shred them in a bowl, then reintroduce them to the slow cooker. About 30 minutes before serving, if you are preparing fresh rice start to cook it now. Alternatively for speed we used Tesco own frozen microwave plain rice and prepared them minutes before serving. There was enough here with the sauce being a little thinner than a standard curry due to adding the tomatoes, and the chicken was thigh meat that was shredded, that it fed the three of us and provided lunch for the next day.

Alternatively if you don’t want to use a slow cooker, this will simmer nicely in a large pan on the hob! You can also add more veggies in such as cauliflower for extra 5 a day or even remove the tomatoes to get a thick sauce.

Tuna and egg salad

This is definitely one of the easiest meals! All need to do is just grab all the salad ingredients that you like and bang in a bowl! Then add tuna, some soft boiled eggs, bit of pepper and top it with your favourite sauce/salad dressing!! In the image you will see that my go to for this salad bowl is lettuce, tomatoes, cucumber, sweetcorn and I did (after I’ve took the photo) top it with some good old mayonnaise!

Cheesy Tomato toast

Now out of all of the images this one probably isn’t the most attractive looking meal, however, it’s super tasty, super speedy and even my little one loves it! All you need is a few tomatoes of your choice you can use standard tomatoes, beef tomatoes or even little plum tomatoes. You want to chop them into slightly smaller chunks, pop them into a hot saucepan with an oil of your choice; I tend to use the fry light garlic as it just gives that extra little flavour to it. And you wanna cook it on a medium heat so that the tomatoes start to wilt down you get some natural tomato juice but you don’t lose the chunk so do not mash the tomatoes. Then when you’ve got a slightly more liquidy consistency you want to add the cheese of your choice (I just stick to a standard cheddar), take it off the heat and just stir through! The heat of the tomatoes will naturally melt the cheese and then you want to pour it on top of some toast!

Baked bean chilli

I know what you’re thinking baked beans and chilli surely not. Well I’m telling you yes this is a vegetarian style chilli using baked beans, it’s super quick and I made it whilst washing up on my lunch break one day! Ingredients wise you’ll want one tin of baked beans, it doesn’t have to be Heinz it can be any supermarket own brand as long as it’s baked beans in tomato sauce. Then you’re going to want hot smoked paprika, chilli flakes, garlic granules and hot sauce! In terms of hot sauce I used the Crucials hot sauce and literally just used a splash! Send it’s as simple as adding all the ingredients to a source burn heating on a low to medium heat by until it is hot and serve it with some rice! The level of spice is completely up to you, I like a hot spicy chilli if you prefer a more milder chilli swap the smoked hot paprika for standard paprika and you can also skip the hot sauce. I served mine with a slice of bread with some cream cheese, controversial I know but I love a bit of cheese with chilli!

Bbq Pork Chops, rice and Garlic Potatoes

Facemail is a mixture of supermarket preprepared that you just cook and cooking from scratch. The barbecue pork chops are from Aldi, they are gluten-free and you would just cook them following the instructions that you find on the packet. The rice is a mixture of a golden veg frozen rice bag and I frozen plain rice bag. Then the potatoes is a recipe from my friend and she said it is a slimming world recipe that she’s just tweaked, so it might not technically be syn free if you followed the slimming world diet but it does make some really nice tasty potatoes. All you need is some new potatoes or potatoes that you chop into smaller chunks, oil, garlic, smoke paprika, salt and pepper! Heat some oil in a ovensafe dish and pop your potatoes into some water and hope to parboil. When is your potatoes are parboiled, I do tend to do mine slightly longer than the recommended power boil I am so I do it for 20 minutes, you want to transfer the potatoes to the hot oil in the dish (that you’ve heated oil in) please be careful it will splash and it’s hot. once potatoes are in the hot oil using a large spoon you want to ensure that all the potatoes are coated then what I tend to do is cover the potatoes in a mixture of garlic granules or garlic powder smoke paprika salt and pepper. I do this now by all but you can do is create a small little season mix in a smaller bowl and sprinkle it over the potatoes. Would use potatoes and I seasoned pop them in the oven for 20 minutes, again I parboil my potato slightly longer than the recommended, you will need to ensure you are checking your potatoes before serving. When you’ve got about 10 minutes left before everything is due to be ready popularising your microwave cooking for how long it tells you to do, you don’t have to use a frozen rice bags you can use standard micro rice or if you’ve got the time cook some rice from scratch! When the rice is ready, plate everything up and serve!! It’s actually so tasty and quite a moist meal, so you don’t require anything else. But if you did want a nice sauce to go alongside I would probably recommend like a garlic mayo/ garlic aioli or a bbq.

Pizza toast / Bruschetta style mozzarella tomatoe toast

So I’ve paid the last two photos together as you can either do them as a pair so little one has the pizza toast and you have the bruschetta style mozzarella tomato toast or you could do everyone has one or the other. For the pizza toast it is a simple as toast your bread, once it’s toasted both sides add a small layer of tomato purée and some mozzarella cheese on top. Pop it under the grill, you do not wanna use a toaster when you’ve got the toppings on and wait for the cheese to melt! That is enough time for the tomato purée to cook through. And then you good to go you have some pizza choice you can always add more toppings to eat such as pepperoni or some pancetta or even some roasted vegetables, it is completely up to you what are you top your pizza toast with. For the Pusheta style mozzarella tomato toast what you want to do is great a little bit of garlic and smeary along your bread toast to bread under the grill trace madness it will be the better way to do it when you’ve got the garlic on top winch of toasted it then add your mozzarella and tomato slices diagonally on top of each other. Then you wanna do a sprinkle of salt and pepper and then if you’re feeling super duper fancy a nice gulp of balsamic vinegar! And then we have a pizza toast and bruschetta style mozzarella and tomato toast.

I hope these recipes have gave you some inspiration or even you’ve looked at it and gone yes that is what I want to make! The purpose of this post was to show that yes sometimes mom guilt/dad guilt creeps in and you feel like these quick simple meals are actually awful! You may feel they don’t offer enough nutrients and I just want to reassure you that they are tasty and fulfilling, we’re all doing our best and out best is all that we can give and that our children ask from us! As long as your child has been fed and watered, and you’ve been fed and watered that’s all that matters! See it this way, if you don’t eat properly you won’t have the energy to do the things you want with your child and that again is just going to trigger this mum/dad guilt!

If you do use one of these recipes then please tag me in your Instagram post, use the hashtag #TheUnluckyCoeliac, or drop a comment on this post! I would love to hear your thoughts, see what you enjoyed and even what you didn’t! If you’ve got ways of upgrading these meals let me know!! Do you have any quick and easy meals? Let me know, drop them in the comments section as well sharing is caring after all! I would love to have a go at some of your quick and easy meals for the working parent!

With love

The Unlucky Coeliac xo

Beryl’s Victoria Sponge Cake

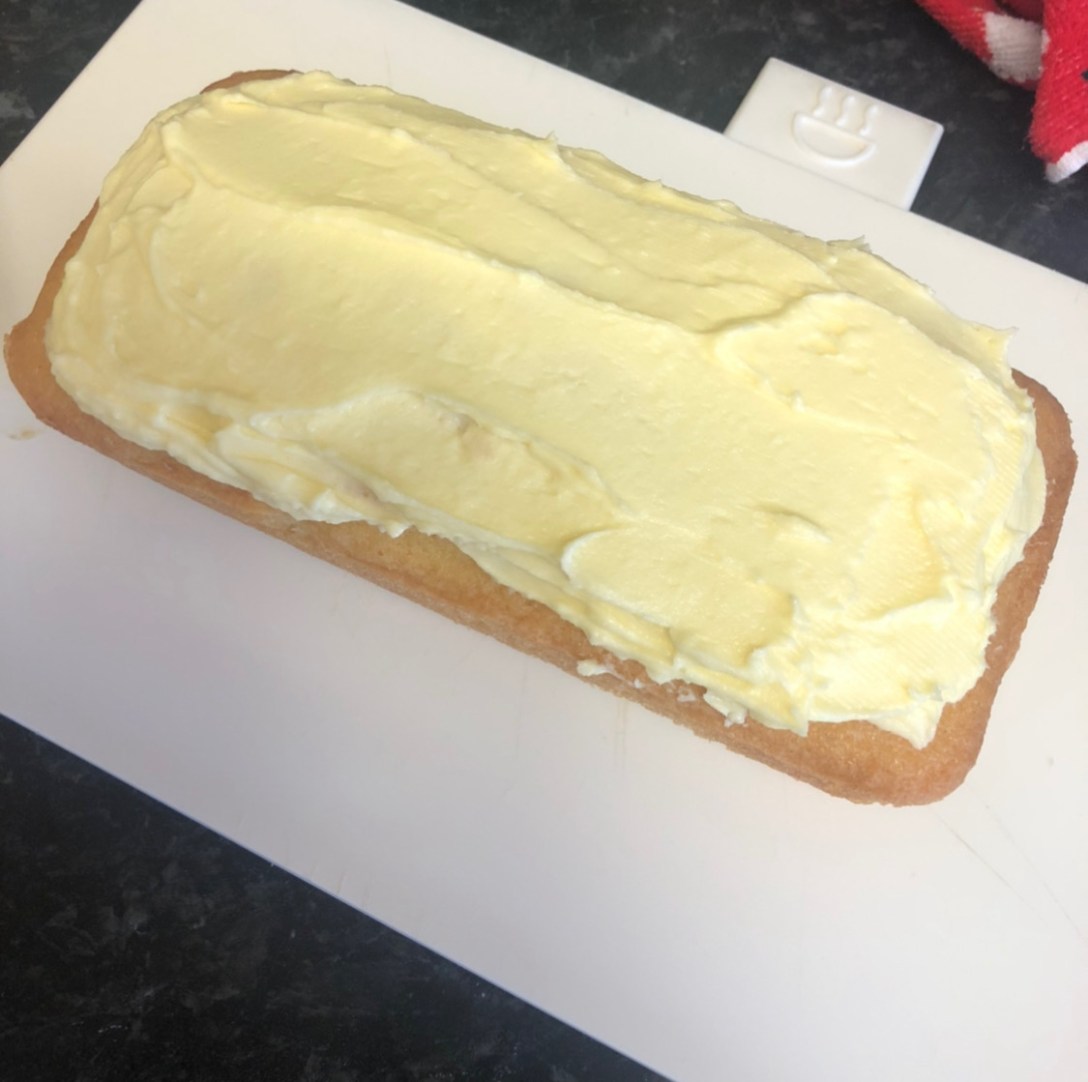
I’ve decided to name this recipe Beryl after my Great Nan, the OG of cake baking! This recipe is based off my Great Nan‘s and so it just felt right to name it after her.

This recipe is Gluten Free, but if you swap the Gluten Free components for Gluten Containing ingredients the cake will still be just as good! It is also a 1:1 ratio when swapping from Gluten Free to Gluten Containing, which makes it super easy for you!!

Ingredients;
8oz Self Raising GF Flour,
8oz Stork Butter (or margarine),
8oz Caster Sugar,
4 eggs (medium),
2 oz Stork Butter (or margarine),
4 oz Icing Sugar,
1tsp of Vanilla extract

(Cake ingredients)

Method for cake;

1. Preheat your oven at Gas Mark 4, this also works out to be approximately 175 degrees for an electric

2. Cream the butter and caster sugar together until you have a light creamy mixture. If you are using an electric whisk or mixer this will only take a couple of minutes, if you are doing it by hand I recommend a large metal spoon and a lot of patience. This took me around 5 minutes to ensure the mixture was creamy and light.

3. Add your eggs bit by bit, for example one egg at a time, ensuring to beat the well with each addition. At this point you will find your batter isn’t the prettiest! That is absolutely fine.

4. You will now want to fold in your flour, ensuring you are adding it bit by bit as to not over mix your batter or throw flour out the bowl. I prefer to fold my flour by hand, however, you can still use an electric mixer.

5. Now you can add your batter to your desired tin! This mixture will fit inside two 7-inch tins. You can either add to one 7-inch tin or two 7-inch or similar sized tins.

6. Once you have moved your batter into your desired tins, bake in the centre of the over for approximately 25-35 minutes for multiple tins or 40-45 minutes for one 7-inch tin. Make sure you check your cake(s) cooked prior to allowing it to cool. I use a skewer* to ensure the batter has cooked through. If the skewer comes out sticky or with a lot of batter visible then it isn’t cooked. If it comes out with a few crumbs then the batter is cooked through.

(*You can purchase a cake testing probe to do the same job as the skewer!)

7. Allow cake to cool, remove from tin(s) and prepare to decorate! If you have used one 7-inch tin you will be able to cut your cake in half and fill it with your desired jam and buttercream to make the perfect Victoria sponge cake! I have included below my go to method for making vanilla buttercream.

Method for Buttercream;

1. Cream your butter and icing sugar together, by adding little bits at a time of icing sugar.
2. Once the mixture is smooth and creamy, add vanilla essence and mix thoroughly.

This is enough buttercream to sandwich the Victoria Sponge cake together, if you double the quantity you will have enough to sandwich and decorate! If you wanted to you could add different flavouring or colouring to your buttercream! Alternatively for chocolate buttercream, you will want to add 1oz of melted chocolate.

I have used this recipe to make Victoria Sponges, loaf cakes and even cupcakes! This quantity makes roughly 24 cupcakes, which is perfect when making them as a gift or as an afternoon cream tea treat…

If you do use this recipe be sure to let me know how you found it via the comments or even on Instagram! You can even use the hashtag theunluckycoeliacrecipe on instagram for me to see your creations!!

with love

The Unlucky Coeliac xo

Baked Oats Muffins Recipe

A breakfast favourite of mine is baked oats! This is something I first became aware of when I was following the Slimming World plan around 6ish years ago. I still use the basics of the recipe but myself and my Mom have tweaked it a little with how we serve it! Which lets face it is the most important bit…

For this recipe you will need the following;
– 40g Gluten free oats
– 50ml Soya Milk (or any milk of your choice)
– Blueberries & Blackberries (raspberries and strawberries also work
amazingly in this)
– 1 table spoon of Sweetener
– 1 Egg (or half a banana)
– Vanilla Essence (Lemon or Almond flavouring work really well with this too)

Now the fun bit! Pre heat the oven at Gas Mark 5!

1. Mix the oats, milk, sweetener and egg together in a bowl.

2. Add 1/2 tea spoon of Vanilla Essence or flavouring of choice and mix well

3. Add fruit of choice to your cases/non-stick muffin tin (this mixture makes four muffins)

5. Evenually add the mixture into your cases, and bake for 25 minutes.

6. Once baked you can either allow to cool for 5 minutes and enjoy them or allow to cool completely and pop in a sandwich box for lunch, a snack, dessert or breakfast the next day!

Now so far this is perfectly following the slimming world recipe, however I like to add a twist to it by drizzling yoghurt over the top of them and allowing them to cool so the yoghurt stiffens, or adding a drizzle of Sweet Freedom’s Choc Shot!

If you are feeling even more adventurous you could make them using poppy seeds and lemon, or carrots and almonds with a cream cheese drizzle! There are many varieties to this recipe!!

Let me know if you use this recipe and share your images with me on Instagram (@theunluckycoeliac) or in the comments below!

With love

The Unlucky Coeliac xo